OpenID Connect
This integration is used when an organization wants to use Auvious as a standalone solution, outside Genesys Cloud, or with Genesys Engage on-premises. With this integration agents will be able to use their organization credentials to get authorized to use Auvious, aka Single-Sign-On (SSO).
What is OpenID Connect?
OpenID Connect 1.0 is a simple identity layer on top of the OAuth 2.0 protocol. It allows Clients to verify the identity of the End-User based on the authentication performed by an Authorization Server, as well as to obtain basic profile information about the End-User in an interoperable and REST-like manner
More info at https://openid.net/connect/
Prerequisites
- OpenID Connect 1.0 compatible authentication and authorization server, exposed to public internet.
- OAuth2.0 Client/Application allowing openid scope and authorization code flow.
Setup
In order for this integration to work, Auvious team must manually provision an application with the following parameters:
- authorization url
- token url
- client id and secret. These client credentials should allow OAuth2.0 Authorization Code Grant flow, with the following redirect uris (you may only set the uris for the regions that you use):
- EU Region (Belgium, default)
- US Central Region
- Australia (Sydney)
- optionally scope can be provided in order to allow more information such as email avatar etc to be available on the application
- optionally any extra parameters that are necessary for the authorization url
The above must be sent by e-mail at info@auvious.com
This flow is quite similar with the one used in Genesys Cloud, as shown in the diagram below:
Role Management
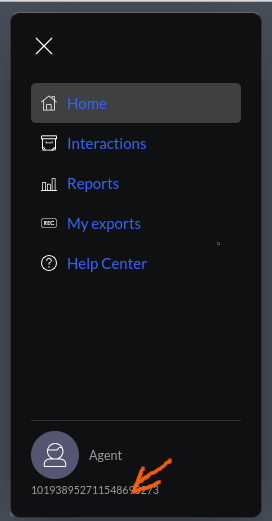
All users that authenticated using OpenID Connect are authorized to do all normal agent functionality, i.e. they get the 'Agent' role. An administrator (role Admin) can assign additional roles to users through the Counselor UI, at Settings>Members section. The administrator needs to know the id_token "sub" claim of the user that he wants to assign a role to. The user can find his id_token "sub" claim easily by clicking on the bottom of the Settings menu, over the role as shown in the image below.

Initially an administrator (role Admin) must be provisioned manually by Auvious, that's why we'll need the id_token "sub" claim of the user that will be the first administrator.